Deluxe Dijon Tofu Scramble With Mushrooms, Broccoli, Pepper and Zucchini
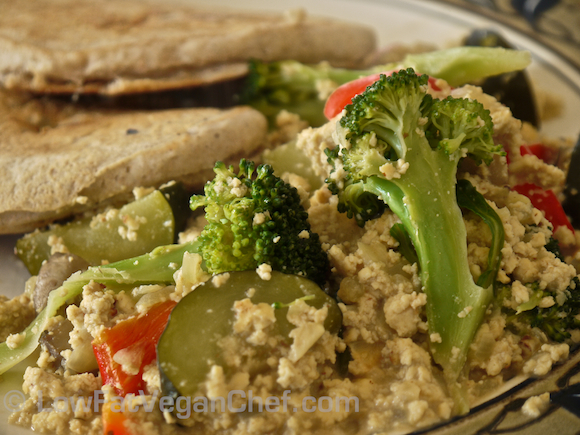
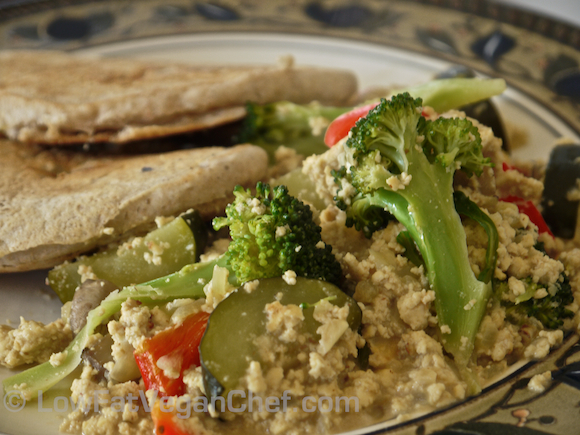
This is by far the best tofu scramble I have ever tasted, including at vegetarian restaurants. It is also the first scramble I have ever made personally. I was really going for something that would be savory and flavourful and have some colour and dynamic to it and not like a plain tofu only style scramble. I guess I wanted to go big or go home, and dove right in.
So I searched around and found great inspiration from my friend Malloreigh’s Semi Famous Tofu Scramble. She puts tons of veggies in her scramble, and I agree it works. So I have made this recipe below A LOT!!! I of course, took out the oil, switched to light coconut milk, and changed some of the seasonings to make this a low fat vegan chef (and Dr. Mcdougall) approved version. I think you will enjoy it just fine without the oil.
Every time someone wants a special breakfast, I make this. My mom and her husband even love it and they are new to tofu and not even vegan. If you’re used to eating eggs, let me tell you this tastes BETTER than eggs because it’s so flavourful, you will think salt and pepper eggs are boring next time you have them.
Some people might think ewh weird eating vegetables for breakfast, but everyone in Asia has soup and vegetables for breakfast, and even Americans have veggies for breakfast! Omelettes are often stuffed with veggies, and so are those potato egg skillet thingies at Denny’s lol. It’s not strange, it’s delicious. Try it! Potatoes do not have to be the lone breakfast veggie any longer.
Here’s my signature version of Tofu Scramble:
Low Fat Vegan Deluxe Dijon Tofu Scramble (with Broccoli, Zucchini, Pepper and Mushrooms)
Serves 4 as a side
Ingredients:
1 package firm tofu, drained (pressed firm tofu is perfect too)
5 tbsp nutritional yeast
1/4 tsp herbamare or salt, or to taste
2 tbsp dijon mustard
2 tbsp maple syrup (or liquid sweetener of choice)
1/2 cup light coconut milk (I use So Delicious SugarFree Original, use unsweetened only please)
1/2-1 onion, diced
2 cloves garlic, minced
2 cups whole mushrooms, chopped (or about 1 -1/2 cups sliced)
1 small crown of broccoli, chopped into half florets
1/2 red pepper, sliced lengthwise and then in half
1/2-1 small zucchini, chopped in half moon thinly (thinner is better to cook faster)
Directions:
1. (Depending on your type of tofu you may or may not need to cut it first before pressing.) Cut tofu into 8 pieces if it’s hard to press with your hands. Squeeze out excess water with your hands or with a tea towel. Crumble tofu into a bowl. If your tofu is easy to crumble, I lay it on a clean tea towel and wrap it up and press all the water out and then crumble it into a bowl. I have used both styles of firm tofu, any firm tofu is good, just get the excess water out. Don’t use silken tofu for this.
2. Add the nutritional yeast, herbamare or salt, dijon mustard, maple syrup and half of coconut milk. Mix until combined.
3. Next sauté the diced onion dry in a non stick pan or wok over medium heat until soft. Trust me, it will not stick if you have a good non stick pan. (If you don’t have non stick, you can use vegetable broth to cook in) Add the garlic and mushrooms; stir and cook for about 3-4 minutes. (The mushrooms should release water and keep everything from drying out and sticking)
4. Add the crumbled tofu and cook, stirring or tossing gently for about 10-15 minutes. The tofu is very forgiving. You can basically cook the rest of your breakfast while stirring occasionally in your non stick pan without worry. If your non stick pan is not so great, you can add a little vegetable broth or water and in small amounts and keep stirring. You want the tofu to absorb the flavours and cook well without burning.
5. When your other breakfast stuff is almost ready (if you have any), add the broccoli, zucchini, red pepper, and the rest of the coconut milk, mix together and cover with a pot lid. Let it steam for about 5 more minutes until the broccoli is cooked and bright green. Don’t let it burn, add a little more liquid if needed if it’s really dry. You can use extra coconut milk or a bit of water.
6. Taste test and adjust seasonings if desired. You don’t want your tofu to be too wet, just wet enough that everything can cook and not stick to the pan. Serve right away. I like to eat mine with hash browns or my vegan banana pancakes.
Additional Tips:
Make sure your zucchini is sliced thin enough, you probably don’t want hard crunchy zucchini. If you cut it thicker you can add it right after the mushrooms and cook it with the tofu before you add the rest of the vegetables.
Cook your vegetables until they are the tenderness that you like. Try not to overcook them so the broccoli stays together and looks nice.
Variations:
You can change out any of the vegetables if you don’t like them, or don’t have them. It may sound weird having broccoli for breakfast but trust me, it is delicious and not weird! My family loves it. I think the essentials would be onions and mushrooms in this recipe. You could also throw some spinach in at the last minute to wilt if you like instead of broccoli or zucchini.
If you are feeding more people, you can just up the veggies in this recipe and spread out the scramble. I’ve done that and served 5 people a side serving before fine. If it’s just 2 of you, you can share it with some fruit, toast, pancakes etc and be stuffed!
Add some spiciness to the dish with some tobasco or chipotle chili powder if you want to heat it up.
Have you ever made tofu scramble before? What do you think of this recipe?

